Kessil WiFi App
User Manual
Connection
Dashboard
Group
Mode
Settings
FAQ
Connection
Step 1
Download App

Android Operating System 5.0 (Ice Cream Sandwich) or above is recommended.
Resolution must be 360x640 dp or above.
iOS 10.0 or above is recommended
Step 2
Basic Setup
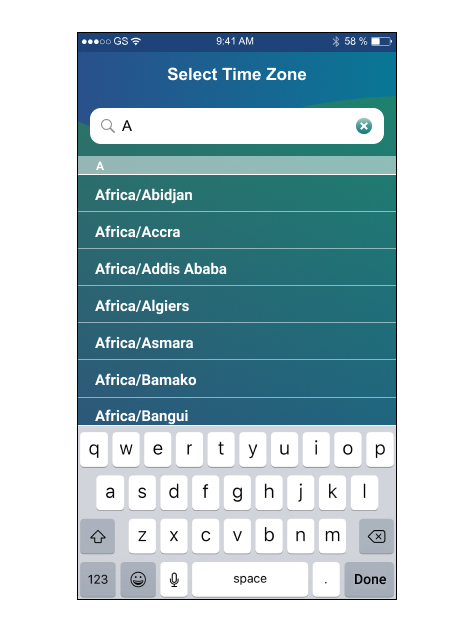
Type in the closest major city near you

Select one of the links to sign in with the social media accounts or skip the process. By continuing, you accept the Terms of Service and Privacy Policy.
Step 3
Set up WiFi
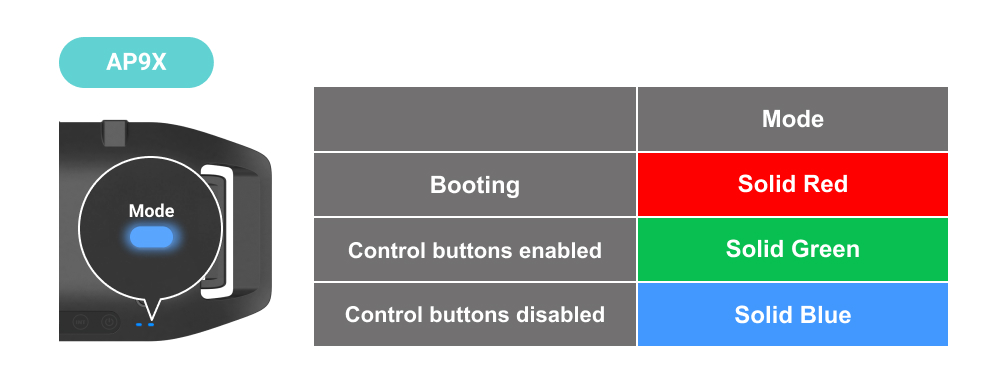
AP9X & WiFi Dongle Indicator States
Wi-Fi Indicator States
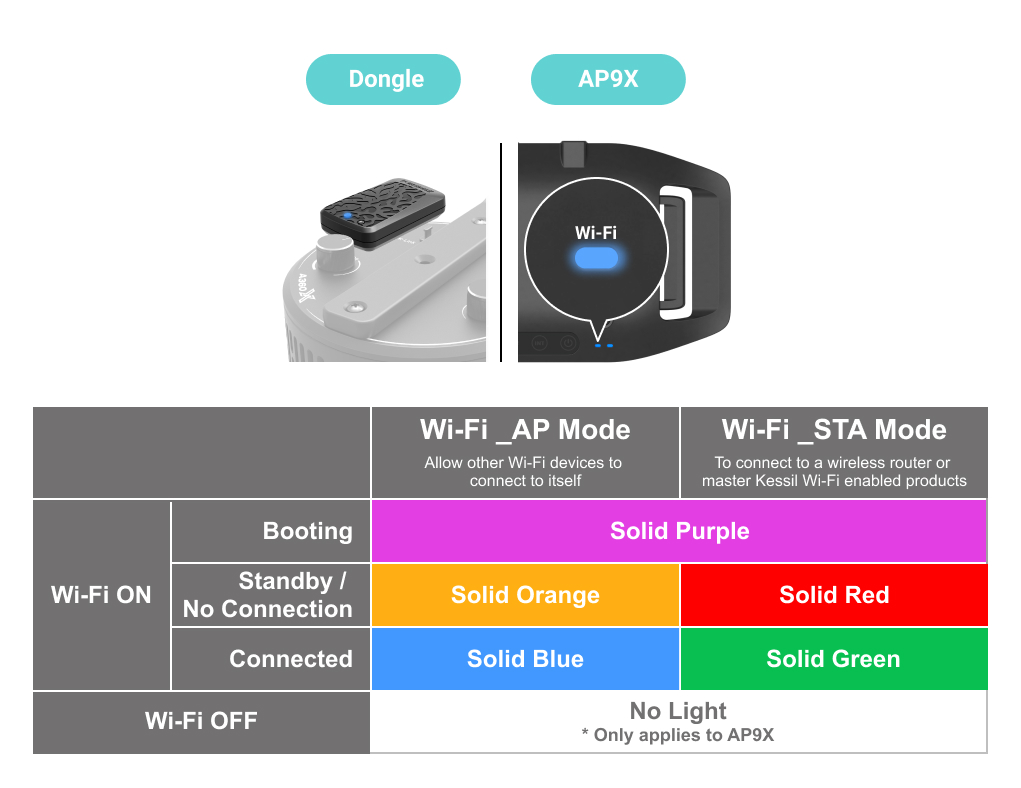
Wi-Fi_AP Mode
Allow other Wi-Fi devices to connect to itself
Wi-Fi_STA Mode
To connect to a wireless router or master Kessil Wi-Fi enabled products
AP9X Mode Indicator States
Set up WiFi
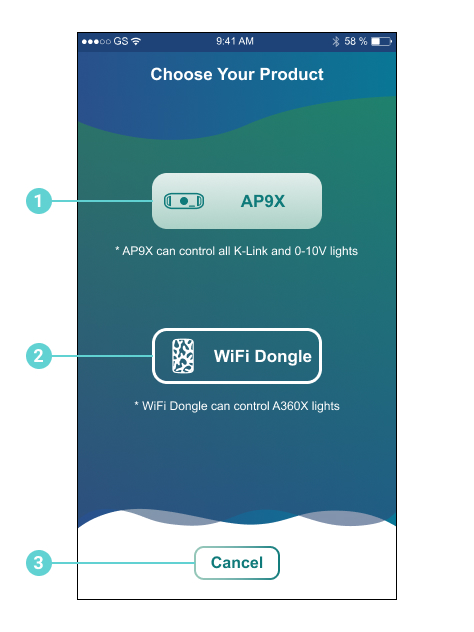
1 AP9X Button
2 WiFi Dongle Button
3 Cancel Button
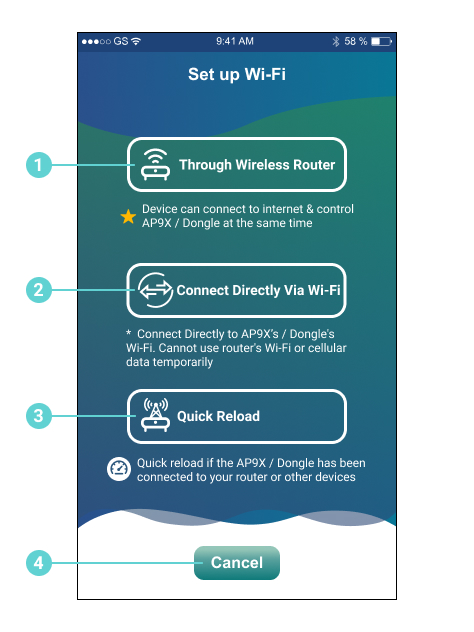
1 Through Wireless Router
2 Connect Directly Via WiFi
3 Quick Reload
4 Cancel Button
Cancels the setup procedure and goes to Dashboard
Dongle LED
Solid Purple
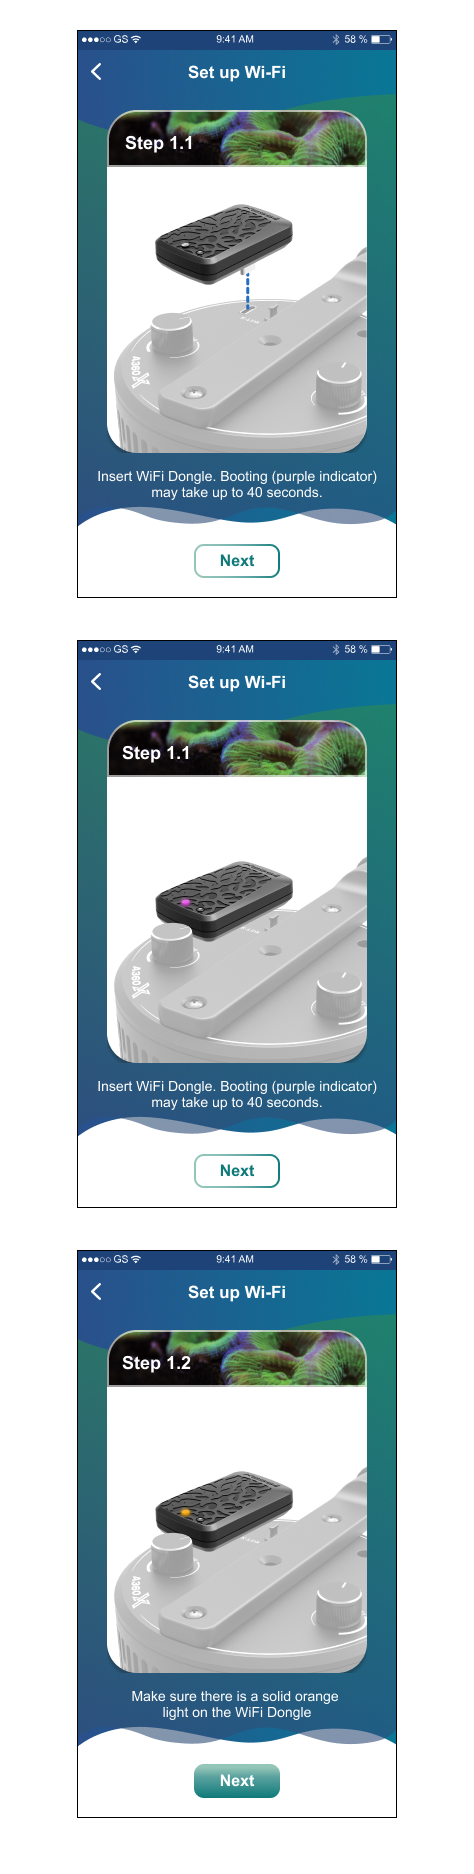
The WiFi Dongle requires 40 seconds to boot. The WiFi Dongle Status Indicator will show solid purple light.
Solid Orange
Standby mode, ready to be connected.
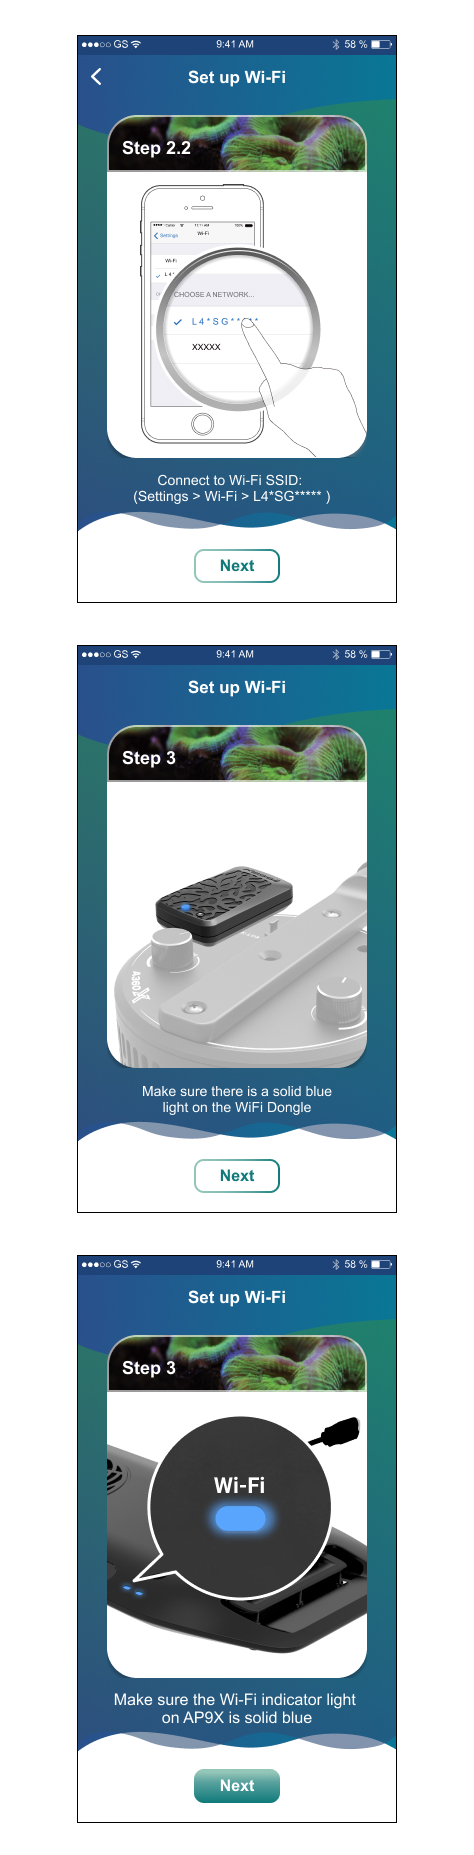
AP9X Wi-Fi LED
Solid Purple
AP9X requires 40 seconds to boot. The AP9X Wi-Fi Indicator will show solid purple light.
Solid Orange
Standby mode, ready to be connected.
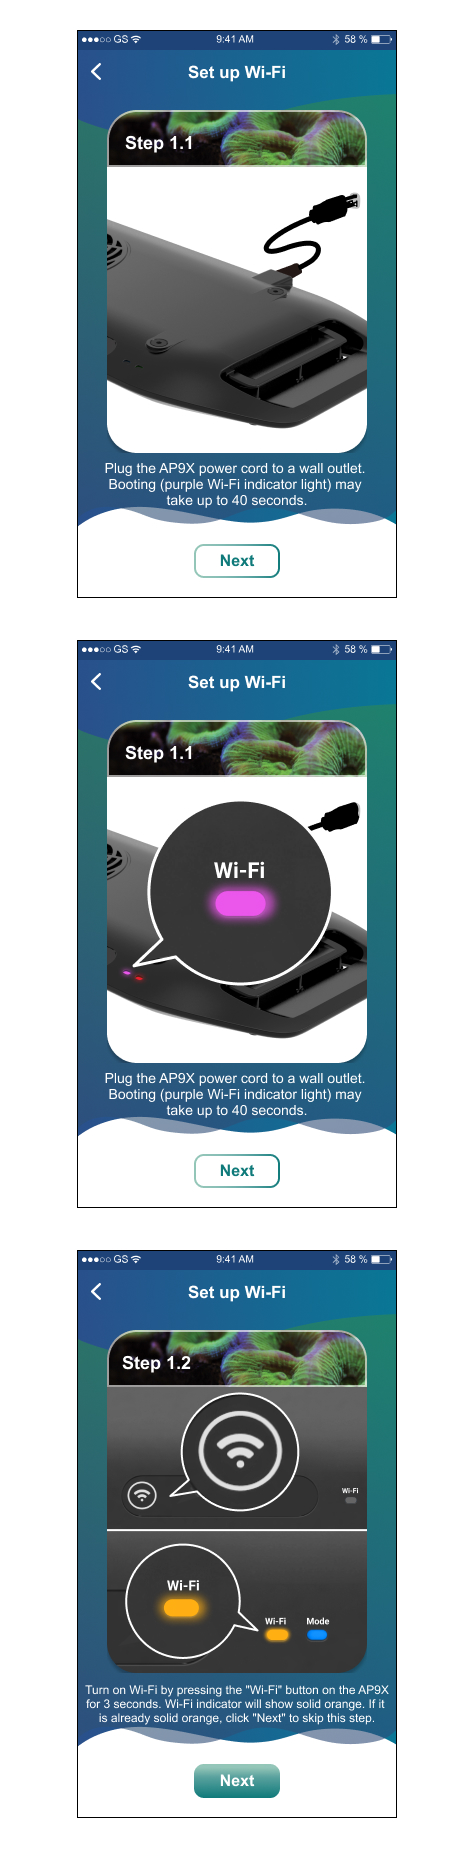
Scan QR Code
1 Back to Step 1 - Power
2 Scan QR Code
Make sure your phone's camera permission is turned on
3 Skip Button
Skip and use other connection method

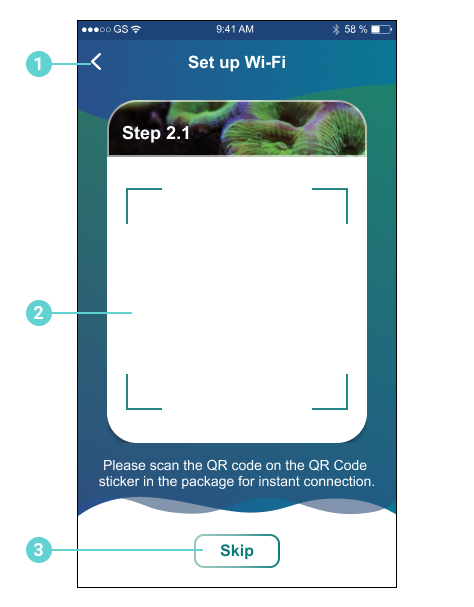
Through Wireless Router
1 Back to Step 1 - Power
2 Router List
3 Router signal strength
4 Scan Again
5 Save Password
Check the box to save password of your router for future connection
6 Next Button
Solid Green
STA Mode.
Successfully connected to wireless router or to the master AP9X / WIFi Dongle as slave.
Connect Directly Via WiFi
Connect Directly to Dongle's WiFi. Cannot use router's WiFi or cellular data temporarily
Solid Blue
AP Mode.
Successfully connected to mobile device and act as the master (through "Connect Directly Via WiFi").
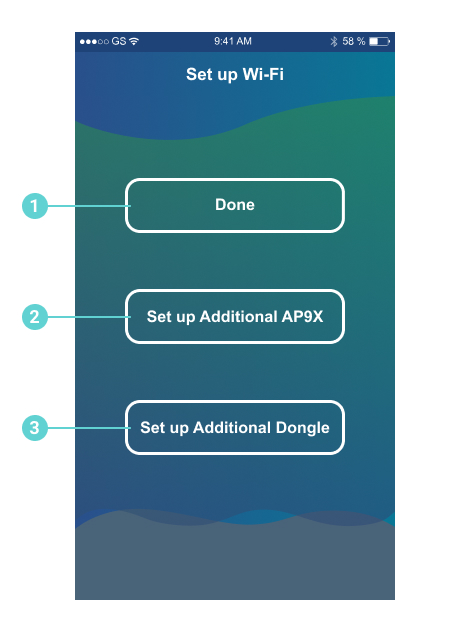
1 Done Button
Complete the Set up Wi-Fi connection
2 Set up Additional AP9X Button
Continue to set up next AP9X
3 Set up Additional Dongle Button
Continue to set up next Dongle
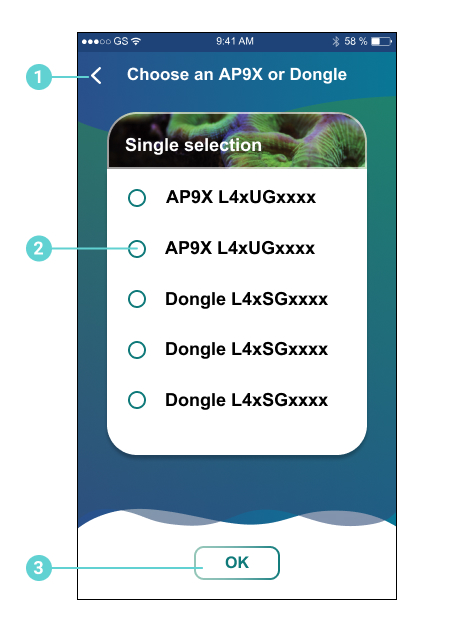
Quick Reload
Quick reload if the Dongle has been connected to your router or other devices
1 Back to Set up WiFi
2 Choose a AP9X / Dongle
You can only choose one AP9X / Dongle here. If multiple AP9Xs / Dongles are previously connected together, they will all be loaded on Dashboard
3 OK Button
Dashboard
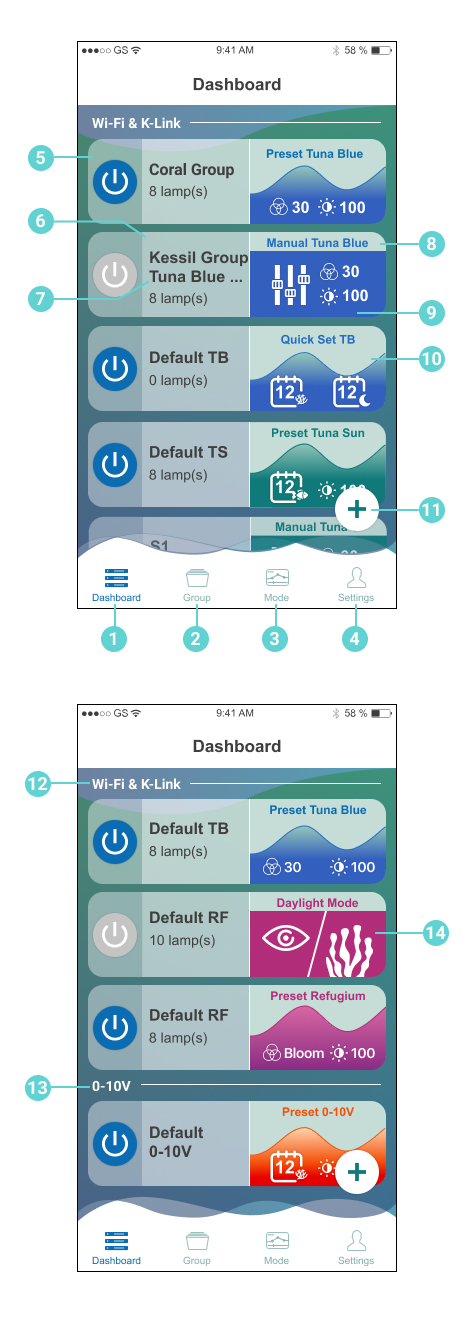
Dashboard
1 Dashboard
An overview of connected lamps, including group information and lamp status
2 Group
To change group's name, add groups, exchange groups, etc.
3 Mode
To access Manual Mode and Program Mode
4 Settings
5 All On / Off
6 Group's Name / Quick access to "Group"
Tab to enter "Group" section
7 Number of Lamps
Indicates number of lamps in a group
8 Lamp Status / Quick access to "Mode"
Indicates the mode and brief info that the group is running. Tab to enter "Mode" section
9 Program's Name
10 Program
Indicates the current color & intensity level. Also shows if acclimation or lunar cycle mode is turned on
11 Refresh / Add AP9X / Add Dongle / Quick Reload
12 Wi-Fi & K-Link Group
13 0-10V Group
14 Daylight Mode
Only with A360X Refugium, for illuminating refugium or taking photos
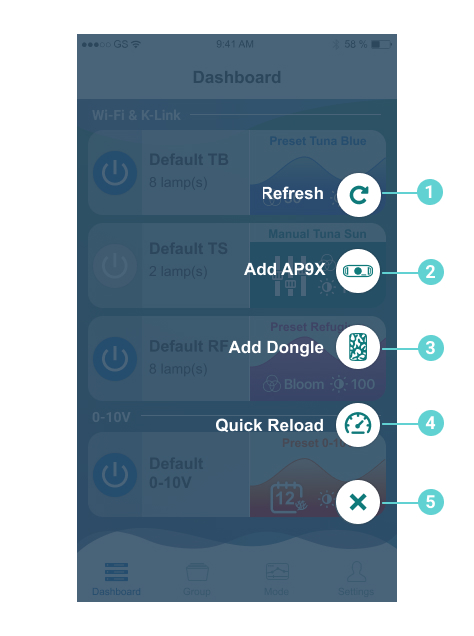
Refresh / Add AP9X / Add Dongle / Quick Reload Button on Dashboard
1 Refresh
Search for existing and new lamps
2 Add AP9X
Connect to new AP9X(s)
3 Add Dongle
Connect to new WiFi Dongle(s)
4 Quick Reload
If a AP9X / WiFi Dongle has been connected to your router or other devices before, you can quickly load it back without reconnecting to it
5 Cancel Button

Gesture Action
1 Swipe down to refresh
Quick way to search for existing and new lamps
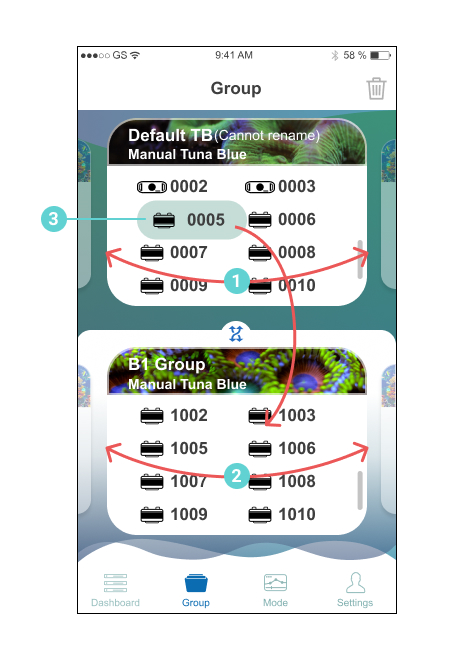
Group

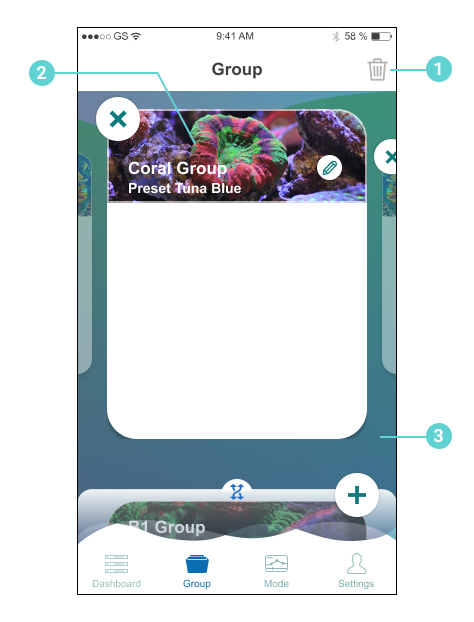
Group
1 Group's Name
2 Program's Name
Indicates the program that is currently running under this group
3 Delete Group Button
Press the Delete Group Button and the  button will show up.
Tab to delete group
4 Edit Group's Name
5 Find Me
Flashes light to indicate location
6 Disconnection Alert
7 Arrange Group
Swipe up to start arranging groups
8 Add Group
Delete Group
1 Delete Group
Press the Delete Group Button and the button shows up.
Tap to delete group
2 Delete Group Gesture (Alternative)
Press and hold until the button shows up.
Tap to delete group
3 Cancel Delete Group Action
Press any blank area to cancel the delete group action

Gesture Action
1 Swipe left and right for other groups
2 Swipe up for grouping
Gesture Action (Cont.)
1 Swipe left and right
2 Swipe left and right
3 Move Lamp
Press, hold, and drag to another group
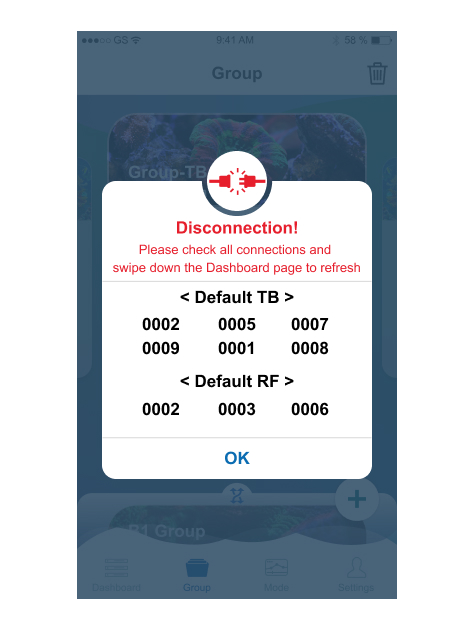
Disconnection
Please check all connections and swipe down the Dashboard page to refresh
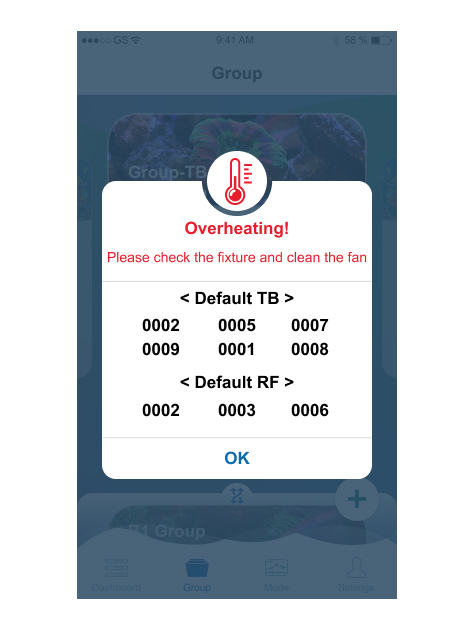
Overheating
Please check the fixture and clean the fan. Disconnect it from power to let it cool down. After plugging back in, swipe down the Dashboard page to refresh
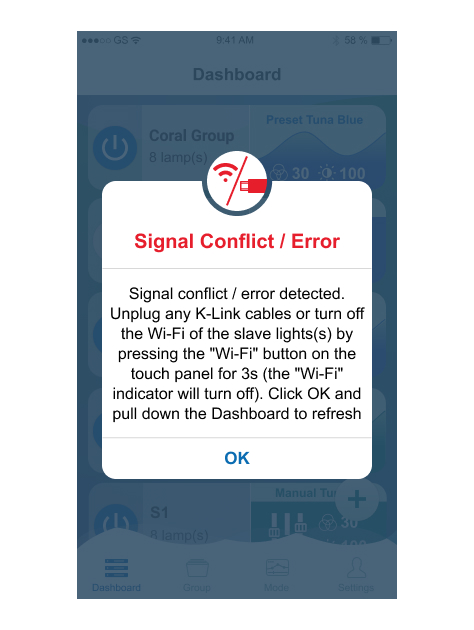
Signal Conflict / Error
Signal conflict / error detected. Unplug any K-Link cables or turn off the Wi-Fi of the slave lights(s) by pressing the "Wi-Fi" button on the touch panel for 3s (the "Wi-Fi" indicator will turn off). Click OK and pull down the Dashboard to refresh
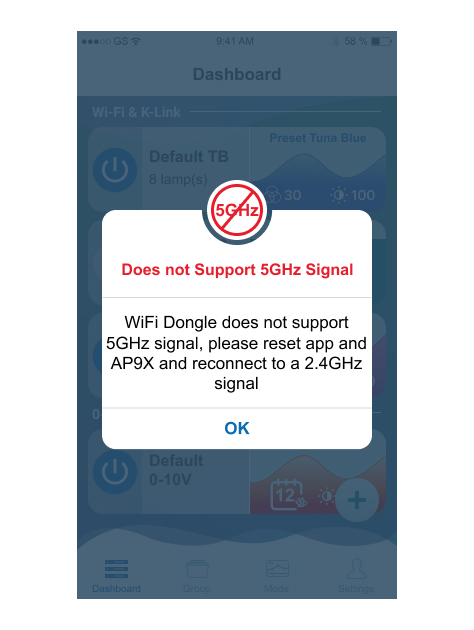
Does not Support 5GHz Signal
WiFi Dongle does not support 5GHz signal, please reset app and AP9X and reconnect to a 2.4GHz signal
Mode
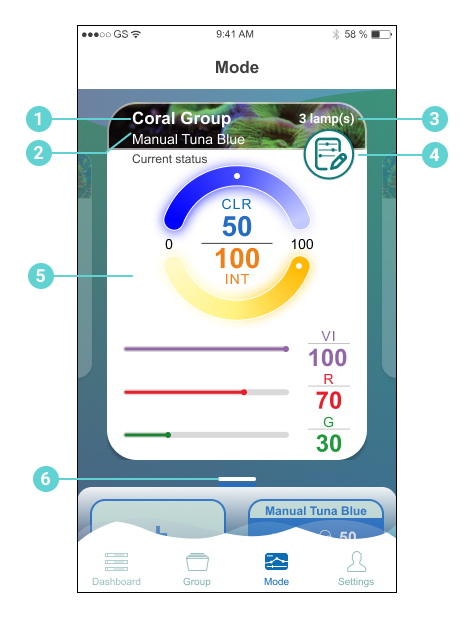
Mode
1 Group's Name
2 Program's Name
Indicates the program that is currently running under this group
3 Number of lamps
Indicates number of lamps in the group
4 Edit
Edit Manual Mode or Program Mode
5 Current Status
6 Program Library
Swipe up for programs
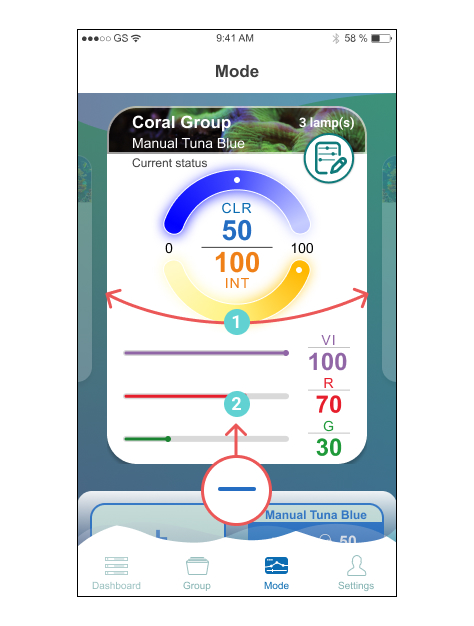
Manual Mode
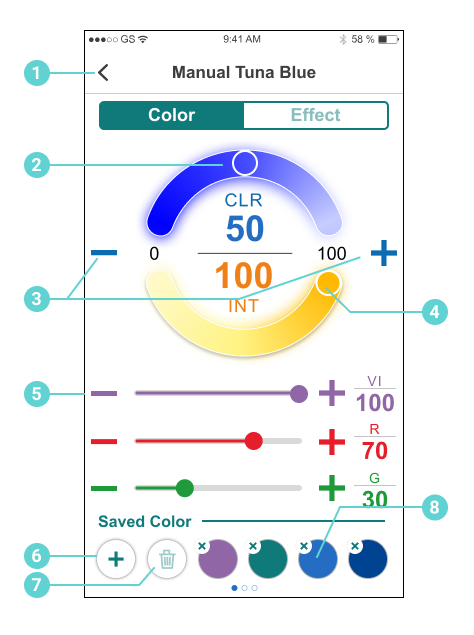
1 Back to "Mode"
Go back and the current settings will be saved
2 Color Panel
Drag the dot to choose the desired color
3 "-" and "+"
Tab "-" and "+" to slightly adjust color or intensity level
4 Intensity Panel
Drag the dot to choose the desired intensity
5 VI & Red & Green Bars
Slide the bars or press "-" and "+" to slightly adjust the VI/R/G values.
6 Save Color
Tab to save your combination of Color & Intensity. Combinations can be used in Program Mode
7 Delete Saved Colors Button
Press the Delete Button and the button shows up.
Tap to delete saved colors
8 Delete Saved Colors Gesture (Alternative)
Press and hold until the button shows up.
Tap to delete saved colors
Effect Mode
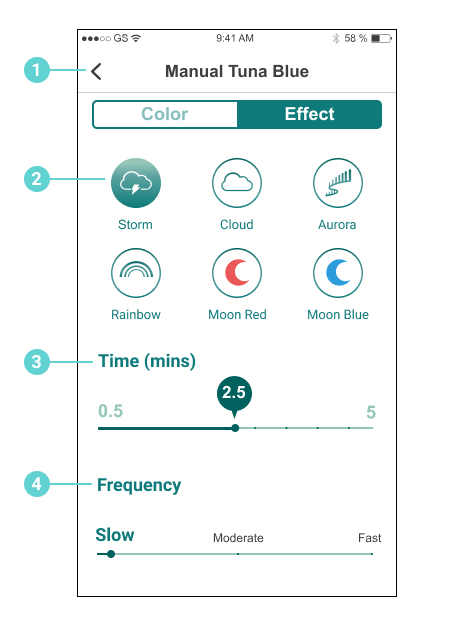
1 Back to "Mode"
Go back and the current settings will be saved
2 Effect Mode
Demonstrates these effects: Storm, Cloud, Aurora, Rainbow, Moonlight Red, Moonlight Blue
3 Time
Length of the effect in minutes
4 Frequency
The frequency of the effect during the above time period
Gesture Action
1 Swipe left and right for other groups
2 Swipe up for programs

Program Mode
1 Group's Name
2 Program's Name
Indicates the program that is currently running under this group
3 Number of lamps
Indicates number of lamps in the group
4 Edit
Edit Manual Mode or Program Mode
5 Program Graph
6 Current Color & Intensity
Displays the current color & intensity level of the program
7 ON/OFF Button for Acclimation
8 Acclimation Information
9 Edit Acclimation
10 ON/OFF Button for Lunar Cycle
11 Lunar Cycle Information
12 Edit Lunar Cycle
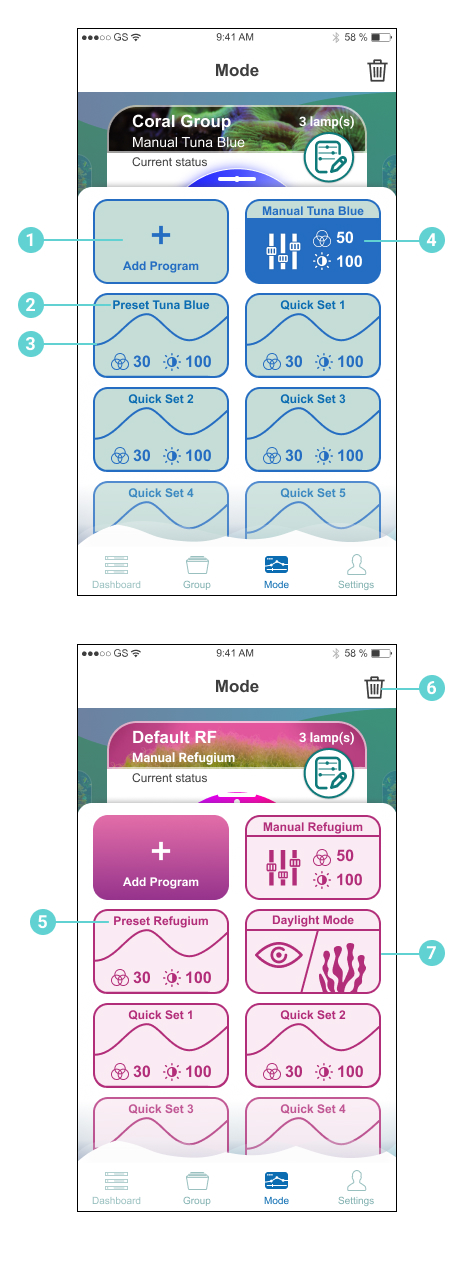
Program Library
1 Add Program
Tab to add up to 11 programs for each model type
2 Program's Name
Tab twice to edit program
3 Program
Indicates the current color & intensity level
4 Highlighted Program
Lamp is running the program if it is highlighted
5 Preset Programs
Preset programs cannot be deleted, but can be sorted
6 Delete Program Button
Press the Delete Program Button and the button shows up.
Tap to delete saved colors
7 Daylight Mode
Daylight Mode cannot be deleted,but can be sorted
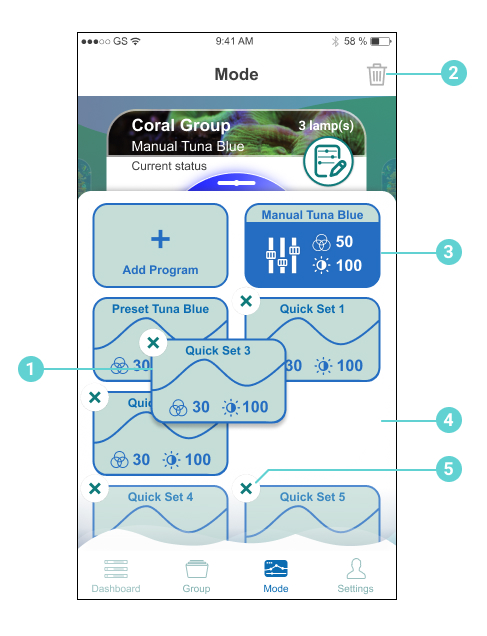
Sort or Delete Program
1 Sort
Press, hold, and drag the program to change the order
2 Delete Program
Press the Delete Program Button and the button shows up.
Tap to delete program
3 Delete Program Gesture (Alternative)
Press and hold until the button shows up.
Tap to delete program
4 Cancel Delete Program Action
Press any blank area to cancel the delete program action
5 Press to Delete Program
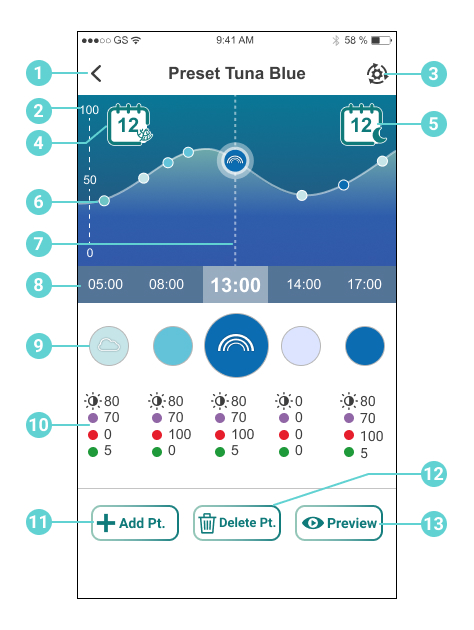
Customizing Program
1 Back to "Mode"
Go back and the current settings will be saved
2 Intensity Level
3 Default Button
Tab to revert to the default preset program. Only available in Preset program
4 Acclimation's Day
Indicates the progress of the Acclimation Mode
5 Lunar Cycle's Date
Indicates the progress of the Lunar Cycle
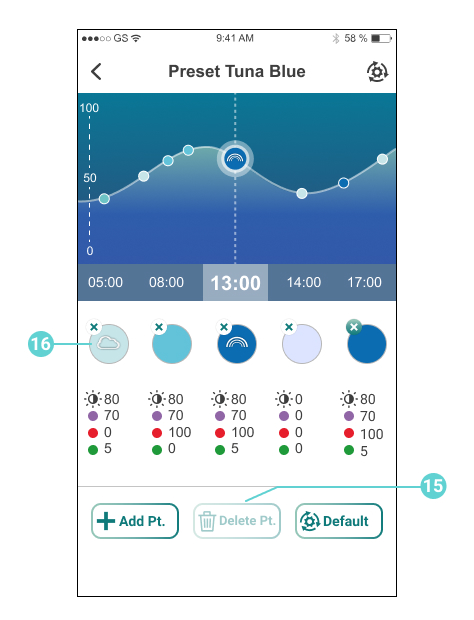
6 Program's Curve
7 Color & Intensity of Selected Time Point
8 Time Axis
Slide to the left or right to choose another time point
9 Program Point
Shows the color of the program point. Click the enlarged program point to edit
10 Program Point's Intensity Information
11 Add Program Point
12 Delete Program Point
Press the Delete Pt. Button and the button will show up.
Tab to delete program point
13 Preview Program in 30s
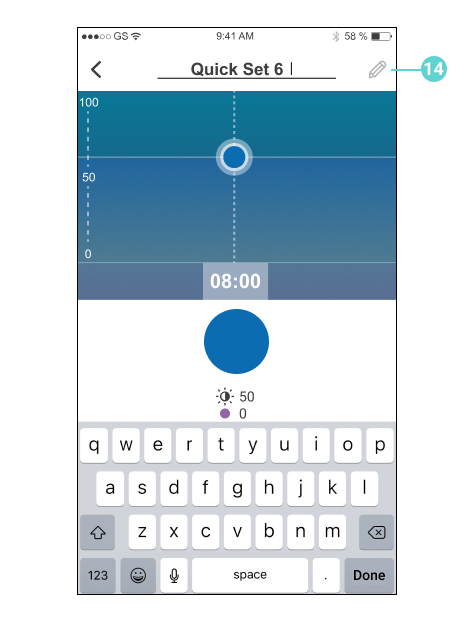
14 Edit Program's Name
Tab to edit program's name. Preset program's name cannot be changed
Delete Program Point.
15 Delete Program Point Button
Press the Delete Pt. Button and the button will show up.
Tab to delete program point
16 Delete Saved Colors Point Gesture (Alternative)
Press and hold until the button will show up.
Tab to delete program point
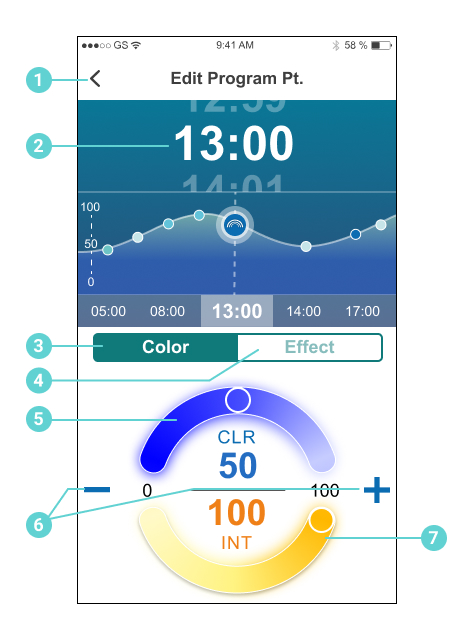
Edit Program Point
1 Back to "Program"
Go back to the program page and the point's settings will be saved
2 Time
Scroll up or down to change the hours and minutes
3 Color Tab
4 Effect Tab
5 Color Panel
Drag the dot to choose the desired color
6 "-" & "+"
Tab "-" and "+" to slightly adjust color or intensity level
7 Intensity Panel
Drag the dot to choose the desired intensity
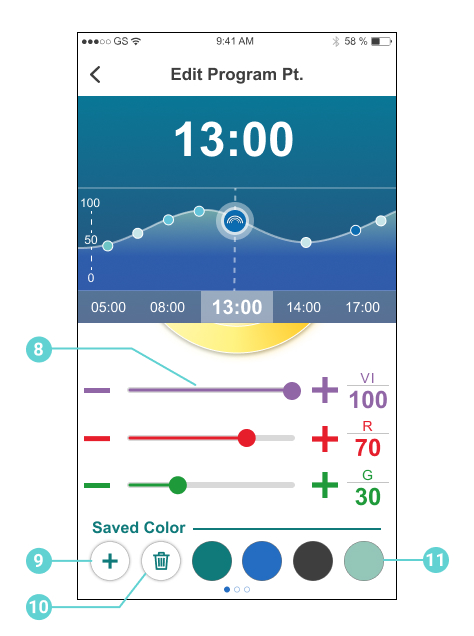
8 VI & Red & Green Bars
Slide the bars or press "-" and "+" to slightly adjust the VI/R/G values
9 Save Color
Tab to save your current combination of Color & Intensity for future use
10 Delete Saved Color
Press the Delete Saved Color Button and the button will show up.
Tap to delete saved colors
11 Saved Color & Intensity
Tab to apply previously saved Color & Intensity combination
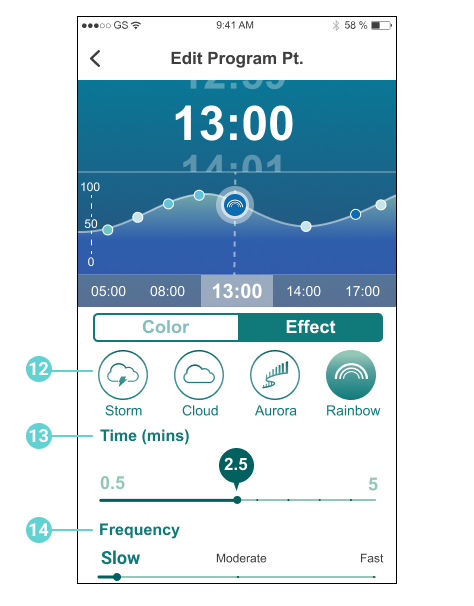
Edit Program Point - Effect Tab
12 Effect Options
There are four effect options: Storm, Cloud, Aurora and Rainbow.
13 Time
Length of the effect in minutes
14 Frequency
The frequency of the effect during the above time period
Setting Acclimation
Acclimation mode allows user to lower the light intensity in order for animals to acclimate to the new lights. This can be used when adding new corals or when using Kessil LED lights for the first time.
"Starting Intensity" means a proportion of the point's intensity, e.g. if you have a point at 80% intensity, under Acclimation & "Starting Intensity" as 50%, that point will be at 40% on Day 1, and ramp up gradually to reach 80%
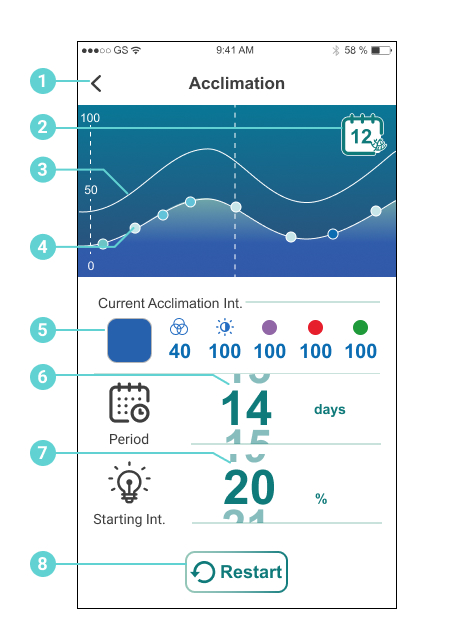
1 Back to "Mode"
Go back and the current settings will be saved
2 Acclimation's Day
Indicates the progress of the Acclimation Mode
3 Program's Curve
4 Acclimated Program's Curve
Today's acclimation curve
5 Current Acclimation Int.
6 Period
Scroll to set/change the Acclimation period
7 Starting Intensity
Scroll to set/change the starting intensity
8 Restart Button
Restarts the acclimation mode, i.e. return to Day 1
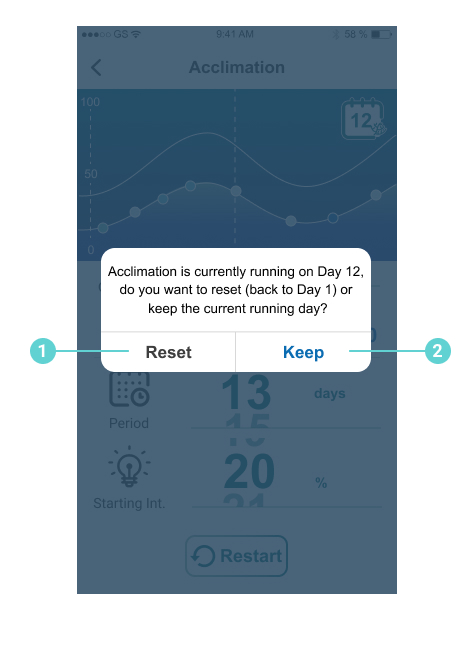
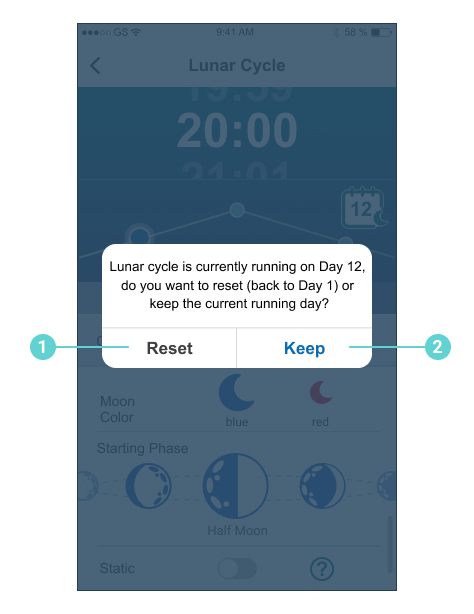
Reset Button of Acclimation Mode
1 Reset Button
Resets acclimation mode and goes back to Day 1
2 Keep Button
Makes no change to the acclimation mode
Set Lunar Cycle
Lunar Cycle mimics a 30-day moon phase cycle utilizing the new ultra low dimming feature, for night-time viewing
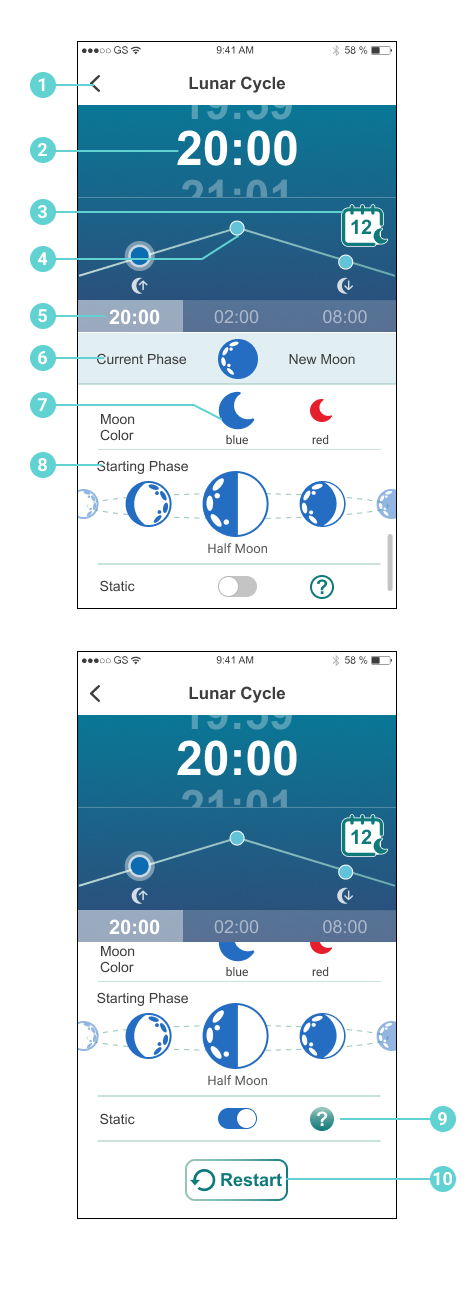
1 Back to "Mode"
Go back and the current settings will be saved
2 Lunar Cycle's Time
Scroll up or down to change the hours and minutes for Lunar Cycle point
3 Lunar Cycle's Date
Indicates the progress of the Lunar Cycle
4 High Moon Point
5 Time Axis of Lunar Cycle
Slide to the left or right to choose another time point
6 Current Phase
7 Moon Color
Tap to set color: Blue or Red
8 Starting Phase
Tap or slide to set starting phase: Full Moon, Gibbous, Half Moon, Crescent, New Moon
9 Static
Static ultra low intensity over the whole period. Does not mimic Lunar Cycle phases.
10 Restart Button
Restarts the Lunar Cycle, i.e. return to Day 1
Reset Button of Lunar Cycle
1 Reset Button
Resets Lunar Cycle and goes back to Day 1
2 Keep Button
Makes no change to the Lunar Cycle
Settings
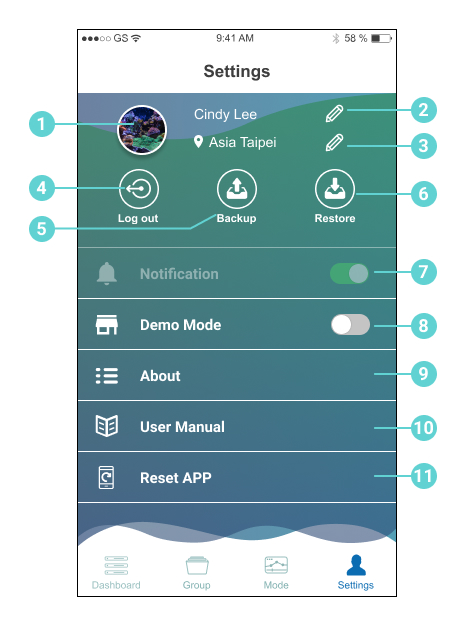
1 Social Media Photo
2 Edit Username
3 Edit Time Zone
4 Log In / Log Out
Logs in or out of social media account
5 Backup to Cloud
Saves current settings and programs to logged-in account. Device needs to be connected to the internet.
6 Restore from Cloud
Downloads saved settings and programs to AP9X / Dongle. Device needs to be connected to the internet.
7 Notification
8 Demo Mode
When Demo Mode is turned on, any adjustments will not be saved. After 5 minutes of inactivity, light will automatically revert back to the settings/programs prior to Demo Mode. This is designed for retail stores to allow customers trying out the control and functions.
9 About
Information about the AP9X(s) / WiFi Dongle(s) and connected lamp(s)
10 User Manual
11 Reset App
The connected lamp profiles, saved color and programs will be removed.
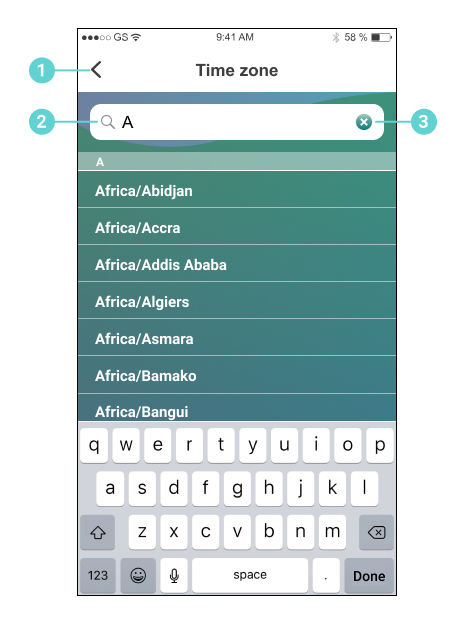
Edit Time Zone
1 Back to "Settings"
2 Type in the closest major city near you
3 Cancel Button
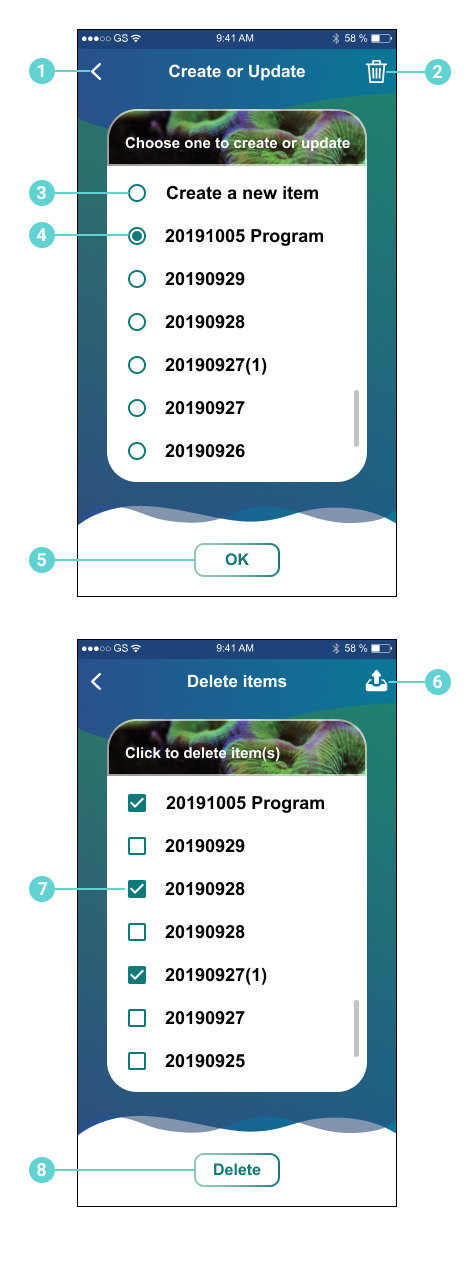
Backup to Cloud
Saves current settings and programs to logged-in account. Device needs to be connected to the internet. Max. 10 profiles can be created
1 Back to "Settings"
2 Delete Backup Profiles Button
3 Create a new item
4 Update item
Select one to directly overwrite the file
5 OK Button
6 Return to Profile List Button
7 Choose multiple items to delete
8 Delete Button

1 Edit item’s name
2 Cancel Button
3 Save Button
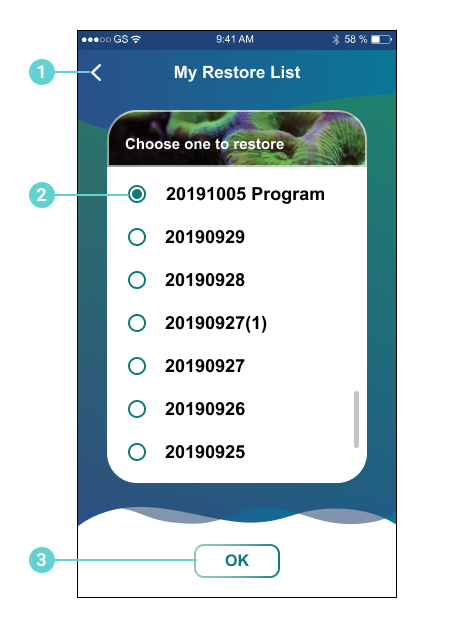
Restore from Cloud
1 Back to "Settings"
2 Choose one to restore
3 OK Button
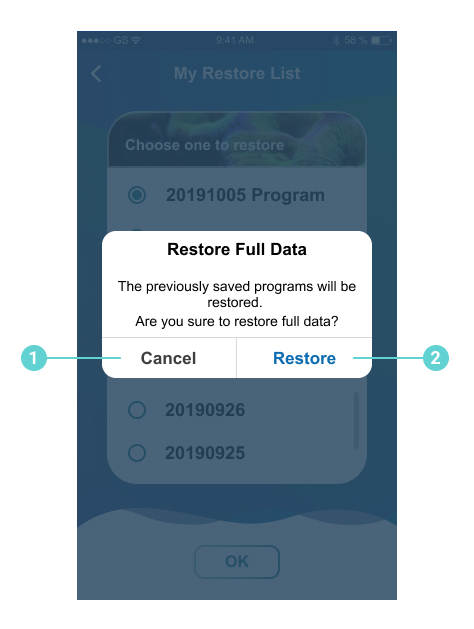
1 Cancel Button
2 Restore Button
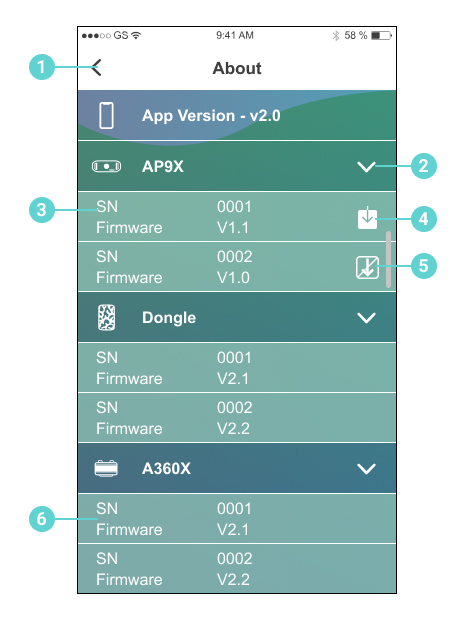
About Section of Settings
1 Back to "Settings"
2 Expand
3 AP9X or Dongle SN / Firmware
4 Firmware Update
Update the firmware of AP9X / WiFi Dongle or lamp through FOTA (Firmware Over-The-Air)
5 AP9X Wireless Connection Needed
Please unplug K-Link Cables on this fixture and connect wirelessly to the app (either through Wireless Router or Connect Directly Thru Wi-Fi)
6 A360X SN / Firmware
FAQ
The Basics
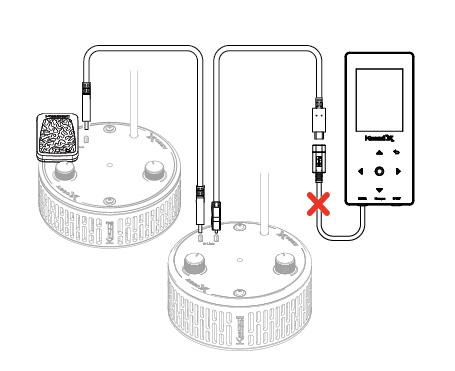
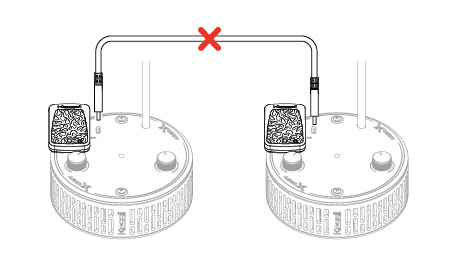
Can I daisy chain multiple A360X and have only one WiFi Dongle?
Yes, you can daisy chain multiple lights (up to 32 lights) using K-Link Cables, and have only one WiFi Dongle on any one of the fixtures. This will minimize wireless interference.
Can I daisy chain multiple AP9X?
Yes, for less wireless interference and more stable connection, you can daisy chain multiple AP9X using K-Link Cables. Make sure only one AP9X has the Wi-Fi signal turned on.
Programming
How to create a program
There are two ways to create a program
Edit from the Preset Programs
Create a new blank programs
Go to the “Mode” tab and swipe up the lower part of the page, you will see Manual settings, Preset programs, and a “+” to add new program
How to edit a program point
In the program page, press the enlarged dot under the timeline to enter the “Edit Program Pt.” page. You can change the time, color, and intensity settings.
Press the back arrow and this point will be automatically saved.
How to create a program point
In the program page, press “Add Pt” at the bottom left corner to enter “Edit Program Pt.” page. You can change the time, color, and intensity settings.
Press the back arrow and this point will be automatically saved.
How to create a new blank program
Go to the “Mode” tab and swipe up the lower part of the page, you will see Manual settings, Preset programs, and a “+” to add new program
Press “+” to add a new program. You will see one single program point.
Edit that single program point to be your program’s starting point.
Press the back arrow and this point will be automatically saved
Press “Add Pt” at the bottom left corner to enter “Edit Program Pt.” page. You can change the time, color, and intensity settings.
Press the back arrow and this point will be automatically saved
Continue to add more program points. Make sure you have at least one program point with 0% intensity so that the light will turn off.
Connection Troubleshooting
Phone cannot connect to AP9X / WiFi Dongle SSID or Cannot find AP9X / WiFi Dongle SSID under WiFi network selection
Make sure the WiFi Indicator Light on the AP9X / WiFi Dongle is Solid Orange.
Make sure the QR Code stickers S/N matches the AP9X / WiFi Dongle S/N.
If AP9X Wi-Fi SSID is still not found, reset the Wi-Fi configuration on AP9X (press the “Wi-Fi” and “Intensity” buttons simultaneously for 3 seconds). If WiFi Dongle SSID is still not found, use a sharp object to press the Reset Button on the WiFi Dongle for 3 seconds.
If you lose the QR Code stickers or they don’t work, the password is the reverse of the S/N (capital letters matter).
Went through the connection steps but the app cannot find anything
Make sure you enter the correct wireless router password on Step 3 of the connection process. The app cannot verify the password.
If you are using an Android phone, you may have enabled simultaneous Mobile Data & WiFi usage settings on your phone, meaning even the phone is connected to the wireless router or AP9X / Dongle SSID, it may switch to Mobile Data and stop connecting to the correct SSID.
Turn off Mobile Data temporarily and restart the connection process.
Make sure the phone is connected to the correct Wi-Fi network. In the app, choose “Quick Reload” to find the lights again.
Check the wireless router’s settings → DHCP settings, change the maximum users or device number to 200.
For Google Pixel phone (Android 10 OS), went through the connection steps but the app cannot find anything
Go to phone Settings → "Wi-Fi Preferences", turn off the "Turn on Wi-Fi automatically" option
When connecting to the AP9X / WiFi Dongle SSID, make sure you choose “Yes” when prompted “Stay connected”
For iPhone, scanning the QR code failed. I already made sure the S/N is correct and WiFi is turned on
This is a known issue with the latest iOS. Turn off and restart your iPhone.
Open the “Kessil WiFi” app and go through the connection process.
Successfully added AP9X(s) / WiFi Dongle(s), but after that one or more AP9X(s) / WiFi Dongle(s) is missing
Make sure you connect to the correct AP9X / WiFi Dongle SSID/Wireless router. For “Connect Directly Via WiFi” , make sure the master AP9X / Dongle has a Solid Blue indicator light, and the slave AP9X(s) / Dongle(s) has a Solid Green indicator light; For “Through Wireless Router”, make sure all AP9X(s) / Dongle(s) has a Solid Green indicator light.
Press “Retry” when the fail to connect message pops up. Try multiple times.
If AP9X(s) / WiFi Dongle(s) is still missing, use “Quick Reload” to quickly load back the AP9X(s) / WiFi Dongle(s).
How to delete connections with AP9X / WiFi Dongle
For AP9X, reset the Wi-Fi configuration on AP9X (press the “Wi-Fi” and “Intensity” buttons simultaneously for 3 seconds); For WiFi Dongle, use a sharp object to press the Reset Button on the WiFi Dongle for 10 seconds until Indicator shows blinking red light, then unplug it from the light fixture.
Wait 10-20 sec, swipe down the Dashboard page to refresh
Grouping
How to arrange groups
Go to the “Group” tab in the app.
Press “+” to create a new group
Press and hold the SSID you wish to move, and drag it to another group
How to delete groups
Default Groups cannot be deleted.
For customized group, press and hold the group and a “x” will appear at the top right corner.
Press the “x” and the group will be deleted.
Phone Settings
Location Settings
For Android phone users, location settings must be turned on to use the app. It helps the accuracy of the wireless connection
WiFi Settings
Make sure in your phone’s “Settings” → “WiFi”, WiFi settings is turned on. Make sure the correct network is selected (wireless router or AP9X / Dongle SSID depending on the connection method)
Battery Saver Mode
For Android phone users, Battery Saver Mode must be temporarily turned off to use the app. To certain Android phones and operating systems, it helps the accuracy of the wireless connection
Reset the WiFi Dongle
How to reset WiFi configuration of WiFi Dongle
Use a sharp object to press the Reset Button on the WiFi Dongle for 3 seconds.
How to factory reset WiFi Dongle (clear all programs, WiFi configurations, etc.)
Use a sharp object to press the Reset Button on the WiFi Dongle for 10 seconds until Status Indicator shows blinking red light.
Reset the AP9X
How to reset WiFi configuration of AP9X
Touch and hold the “Intensity” & “Wi-Fi” buttons simultaneously for 3 seconds to reset the Wi-Fi configuration (i.e. to reconnect). The Wi-Fi indicator will turn solid red. User's settings will not be deleted. The Wi-Fi Indicator will change to solid orange.
How to factory reset AP9X (clear all programs, WiFi configurations, etc.)
Touch and hold the “Intensity”, “Color” & “Wi-Fi” buttons simultaneously for more than 10 seconds to reset the AP9X. The Mode indicator will disappear then blink red. User's settings will be deleted. The Wi-Fi indicator will be solid purple to indicate booting mode (may take up to 40 seconds).
 WARNING
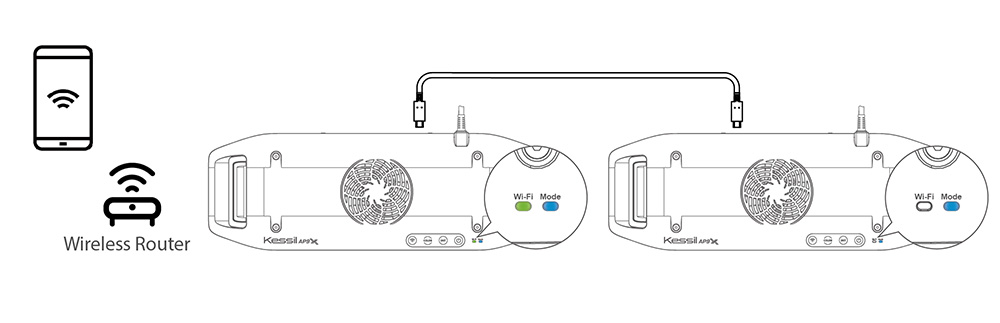
Multiple AP9X (up to 32 K-Link fixtures) can be connected using "Kessil WiFi" app and K-Link Cables. Only the master AP9X should have Wi-Fi signal turned on (Wi-Fi indicator (B) is ON), Wi-Fi signal on the other fixtures should be OFF. Mode Indicator (A) will be solid blue and control buttons are disabled.
CONTROLLED BY SPECTRAL CONTROLLER X
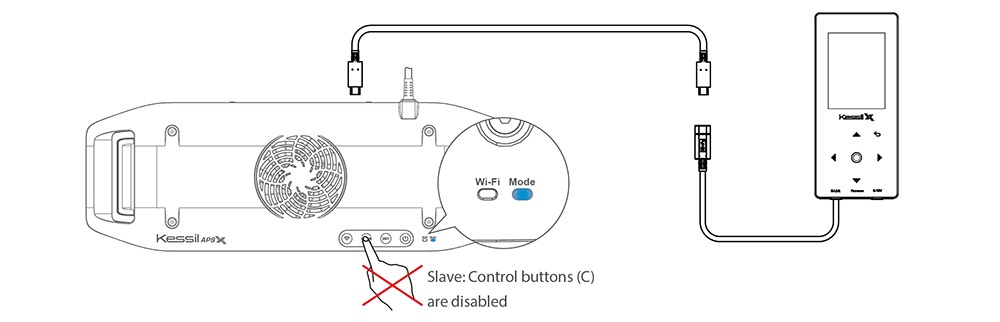
- AP9X can be connected and controlled through Kessil Spectral Controller X with a K-Link Cable.
- The AP9X control buttons will be disabled.
DO NOT plug in both WiFi Dongle and Spectral Controller X